
Mixing and producing polished vocals can seem daunting when you’re first starting out, but the process becomes far more approachable once you break it into logical steps. A vocal chain (also referred to as a vocal processing chain) is simply a series of effects or plugins inserted in a specific order on your vocal track, each serving a distinct purpose in shaping tone, controlling dynamics, and adding character. By following this step-by-step approach, you’ll be able to transform a raw vocal into a professional-sounding performance that sits perfectly within your mix.
In this guide, we’ll build a vocal chain from scratch. Imagine you’ve just recorded (or received) a raw vocal track. Our task is to process it in a methodical sequence that addresses both technical corrections and creative enhancements. We’ll handle common concerns, including pitch issues, unwanted frequencies, and dynamic fluctuations, and we’ll also explore how to add warmth, sparkle, space, and depth. By the end, you’ll have a roadmap for constructing your own vocal chain with the tools you already own, regardless of your DAW. We’ll maintain a DAW-agnostic approach but may occasionally reference a DAW as an example. Let’s get started.
Table of Contents
- Introduction to Vocal Processing Chains
- Step 1: Pitch Correction / Tuning
- Step 2: Subtractive EQ to Remove Mud
- Step 3: Compression to Control Dynamics
- Step 4: Saturation for Warmth
- Step 5: Exciter for Adding Air
- Step 6: De-Esser to Tame Sibilance
- Step 7: Time-Based Effects – Reverb & Delay Sends
- Additional Vocal Chain Techniques
- Conclusion
Introduction to Vocal Processing Chains
A vocal chain consists of several effects placed in a specific order, each effect contributing to the ultimate goal of achieving a clear, polished vocal sound. While every voice and style of music is different, there’s a typical sequence that engineers and producers often follow. Having a general template or framework can be incredibly helpful, especially if you’re a beginner. The following list highlights the usual order of effects in a vocal chain:
- Pitch Correction / Tuning: Ensures the vocal is in tune with the song’s key.
- Subtractive EQ: Before boosting frequencies with EQ, remove unwanted frequencies that cause muddiness, boxiness, harshness in the mix.
- Compression: Controls dynamic range, keeping loud parts from jumping out and quiet parts from being lost.
- Saturation: Adds harmonic richness, warmth, and subtle analog-style compression.
- Exciter: Enhances high-frequency content, giving the vocal “air” and sparkle.
- De-Esser: Tames excessive sibilance in high-frequency consonants like “S,” “T,” or “Sh.”
- Time-Based Effects: Reverb and delay provide a sense of space, depth, and width.

After these core steps, you can explore additional techniques to refine your sound further. While this guide provides a recommended order and approach, keep in mind that audio production is flexible, and rules can be broken if it serves the artistic vision. Nonetheless, understanding the rationale behind each stage will empower you to make informed decisions in any musical scenario.
Step 1: Pitch Correction / Tuning
Pitch correction is often the first step in a vocal chain because it addresses intonation issues right away. Even the best singers can be a little off-key in certain spots, so a light touch of pitch correction helps the entire performance sound more professional. If you were to compress or EQ a vocal that’s out of tune, you’d be applying those effects to a flawed performance. By tuning at the start, you ensure all subsequent processes receive a properly pitched signal.
How to Do It
- Insert a Pitch Correction Plugin: Most DAWs include a basic pitch correction tool, or you can use third-party plugins like Antares Auto-Tune or Celemony Melodyne.
- Set Key and Scale: Determine the key of your track and make sure the plugin is set accordingly. If you’re unsure, you can select a chromatic mode and manually adjust notes.
- Adjust Speed and Note Transition: If you want a natural sound, start with a moderate retune speed and avoid extremely fast settings. Faster speeds create that robotic effect often heard in certain pop or hip-hop tracks.
- Monitor for Artifacts: Listen closely for warbling, unnatural note transitions, or an effect that is too obvious. Slower the retune speed or tweak the plugin’s settings to maintain a natural tone.
Tip: Some producers like to print the tuned vocal to a new track, thereby “committing” to the correction and saving CPU resources. Others prefer to keep it live for flexibility. Whichever method you choose, once you have a tuned vocal, you can move forward knowing the performance is on-key.
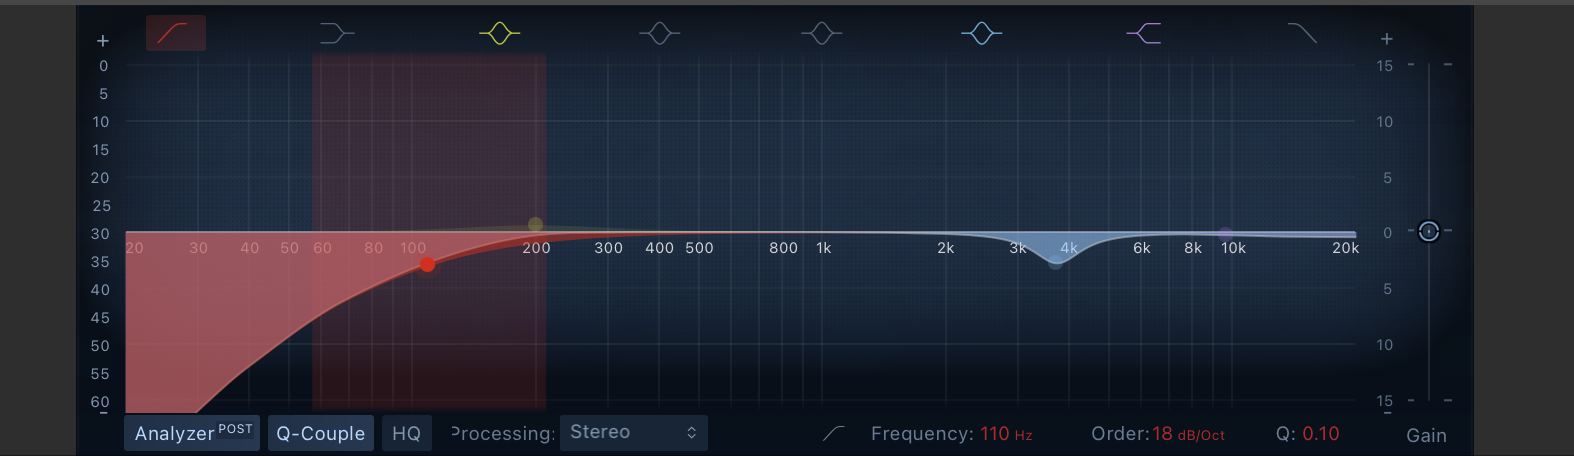
Step 2: Subtractive EQ to Remove Mud
Vocals often contain problem frequencies that cause a muddy mix, boxiness, or harshness. Subtractive EQ is the act of cutting or reducing these problematic areas, which clarifies the signal and prevents subsequent effects (like compression or saturation) from overemphasizing them. By removing “mud” and other unpleasant tonal aspects early, your vocal processing chain remains cleaner as you add further enhancements.
How to Do It
- High-Pass Filter (HPF): Engage a high-pass filter around 75–100 Hz to remove low-frequency rumble, mic pops, and room noise. You’ll rarely need frequencies below 80 Hz in a vocal, but be careful not to remove too much warmth.
- Cut Muddiness (Low-Mids): The 200–500 Hz range often harbors unwanted buildup. A small cut (2–4 dB) at a frequency where you notice “boxy” or “boomy” qualities can open up the vocal. Sweep around to find the exact spot.
- Address Nasal or Boxy Midrange: If the vocal sounds nasal or “honky,” investigate around 600–1 kHz. A narrow cut can help reduce that cardboard-like tone.
- Tame Harsh Upper Mids: If the vocal is too harsh around 2–4 kHz, use a small cut to soften it. This prevents ear fatigue.
- Check Overall Balance: Toggle your EQ on and off to ensure you’ve improved the clarity without losing the vocal’s natural character.
Remember that every voice is unique, so there’s no single “correct” frequency to cut. The key is to identify problem areas by ear. This subtractive approach lays the groundwork for the rest of the vocal chain. You’ll likely hear immediate improvements in clarity and separation.
Step 3: Compression to Control Dynamics
Vocals are inherently dynamic—some words or phrases naturally come out louder, while others are softer. Compression ensures the vocal remains consistently audible in the mix. By taming louder parts and raising softer ones, compression helps the vocal maintain a stable presence and avoids sudden volume spikes that can distract the listener.
How Compression Works
A compressor reduces the volume of signals that exceed a certain threshold. The ratio determines how aggressively it reduces volume past that threshold. Attack controls how quickly the compression engages, and release sets how quickly it stops compressing after the signal drops below the threshold. Properly configured, compression can make a vocal sound more professional, intimate, and in control.

How to Do It
- Threshold: Lower the threshold until the compressor starts reacting on louder peaks. You might see 3–5 dB of gain reduction on the loudest passages.
- Ratio: A soft to moderate ratio (2:1 to 3:1) is standard for vocals. It provides noticeable leveling without overly squashing the performance.
- Attack: Start with a relatively fast attack (40 to 80 ms) so transient peaks are controlled. If the vocal loses too much energy, lengthen the attack.
- Release: Try a medium release (60–120 ms). If it’s too fast, you might hear pumping, and if it’s too slow, quieter words might remain compressed too long.
- Makeup Gain: After compression, the vocal’s overall volume may be reduced. Use makeup gain to match levels so you’re not fooled into thinking compression always makes things quieter or louder.
When set correctly, your vocal will sound more even and stable. If it sounds “choked” or “lifeless,” you may be compressing too aggressively. Subtlety is key, especially if you want a natural result. For certain genres, heavy compression can be desirable—just know when it’s stylistically appropriate.
Step 4: Saturation for Warmth
Saturation is the subtle distortion that arises from analog equipment like tape machines and tube preamps. It can enrich a vocal by adding harmonic content, making it sound fuller and more vibrant. This can bring an otherwise “sterile” digital vocal to life and impart a sense of “analog warmth.
How It Works
Saturation enhances certain overtones in the signal, which can thicken the vocal and provide a slight color. Different types of saturation—tape, tube, or transistor—produce different sets of harmonics. Tube saturation tends to emphasize even-order harmonics, often associated with a “warm and smooth” character, whereas tape saturation can add a subtle high-end lift and natural compression.
How to Do It
- Insert a Saturation Plugin: Place it after compression in your vocal chain. Choose the flavor of saturation you want—tube, tape, console emulation, etc.
- Drive or Input: Increase the input or drive to generate harmonic distortion. Start low and raise it until you notice a subtle thickening or coloration.
- Wet/Dry Mix: If available, blend the saturated signal with the dry to maintain clarity. Some plugins only provide a single output; in that case, be gentle with the drive.
- Adjust Tone (Optional): Some saturators allow you to emphasize specific frequency ranges. You might focus the effect on the midrange for warmth or on the high end for a slight lift.
- Level-Match: Ensure the output from your saturator isn’t drastically louder than the input, or you may perceive it as better simply because it’s louder.
After adding saturation, the vocal should retain its clarity while feeling a bit richer or more engaging. If you hear overt fuzziness or grit, reduce the drive level. The aim is often a “barely noticeable” enhancement that glues the vocal into the mix.
Step 5: Exciter for Adding Air
Once you’ve cleaned and shaped your vocal with EQ, compression, and saturation, you may find the top end still lacks sparkle. An exciter is designed to enhance high-frequency content through harmonic generation, giving the vocal what’s often referred to as “air.” This brightens the signal beyond what a normal high-frequency EQ boost might achieve.

How It Works
An exciter specifically focuses on higher frequencies and introduces new harmonic content, making the vocal appear more open and detailed. Unlike a simple high-shelf EQ, which only raises existing frequencies, the exciter creates subtle additional frequencies that can yield a more polished top end.
How to Do It
- Insert an Exciter: Place it after saturation. Choose an exciter plugin that allows you to target the high-frequency range.
- Frequency Selection: Many exciters let you define a crossover point. For a vocal, select a range around 5–10 kHz and above.
- Amount or Drive: Start low, as exciters can quickly become harsh. Increase the amount until you hear a noticeable lift but not an overblown, hissy top end.
- Mix or Blend: If the plugin offers a wet/dry mix, use that to dial in the desired level of air. Typically, 10–30% is enough for subtle shine.
- Bypass and Compare: Turn the exciter off and on. You should hear a more open, airy quality with it on, without overemphasizing sibilance.
Be mindful that exciters can introduce harshness if overused. Always keep an ear out for unpleasant or artificial-sounding highs. Used in moderation, an exciter can significantly enhance a vocal’s clarity and presence.
Step 6: De-Esser to Tame Sibilance
Sibilance refers to sharp “S,” “T,” and “Sh” sounds that can be painfully bright or annoying, especially after adding EQ boosts or an exciter. A de-esser is a specialized compressor that targets these high-frequency consonants, turning them down as they occur. The result is a smoother vocal that’s easier on the ears.
How It Works
Where a normal compressor operates on the entire frequency spectrum, a de-esser focuses specifically on a narrow band where sibilance occurs (commonly around 5–8 kHz, sometimes higher). When a harsh “S” triggers the threshold, the de-esser reduces gain in that band. It typically releases quickly, allowing the rest of the vocal to pass unaffected.
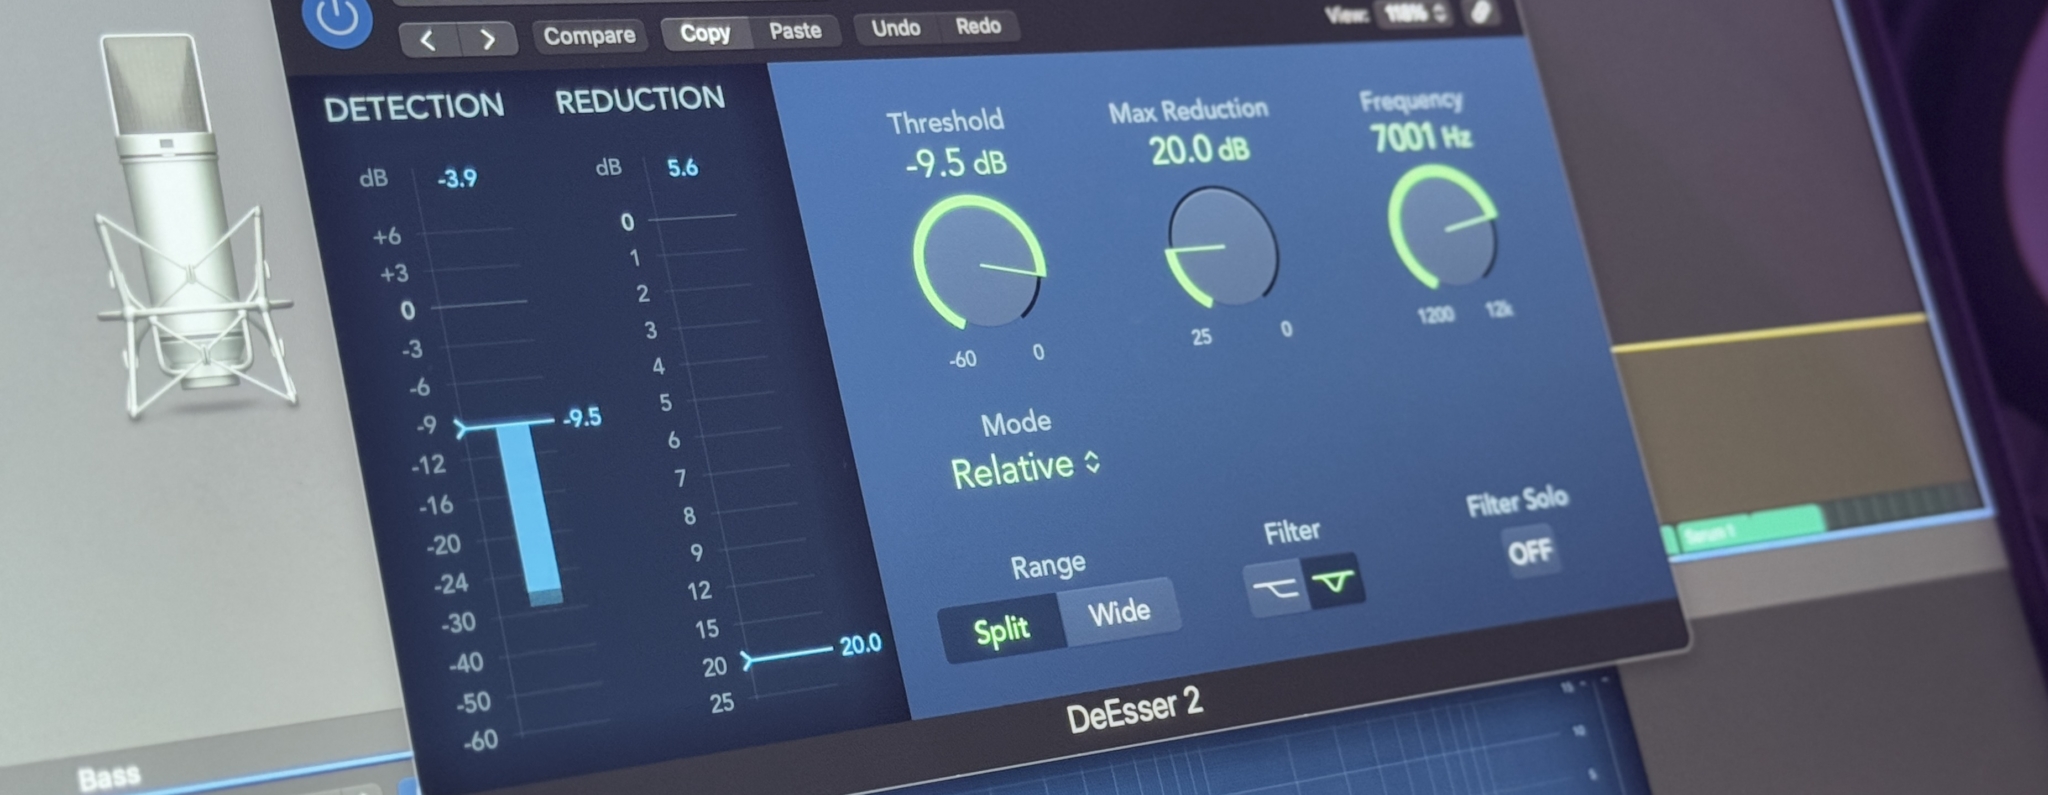
How to Do It
- Insert a De-Esser: Place it after the exciter so you’re taming any excessive highs that result from earlier processing.
- Select Frequency Range: Many de-esser plugins let you solo the sibilant band. Sweep around until you zero in on the exact harsh frequency.
- Set Threshold: Lower it so that only loud sibilances trigger compression, typically yielding around 3–6 dB of gain reduction.
- Adjust Bandwidth: If your de-esser allows you to tweak the bandwidth, make sure it’s narrow enough to catch sibilance but not so wide that it dulls the vocal.
- Listen for Lisping: Too much de-essing can result in a lisp-like sound. If that happens, raise the threshold or reduce the amount of reduction.
Done properly, de-essing preserves vocal clarity while removing the sharp edges of “S” sounds. It’s an essential final step in the core vocal chain before you move on to adding spatial effects.
Step 7: Time-Based Effects – Reverb & Delay Sends
With the raw sound of the vocal now shaped and controlled, the next step is to place it in a spatial context. Reverb and delay are typically used as send effects rather than inserts. This means you route a portion of the vocal signal to auxiliary buses or channels containing reverb and delay plugins, giving you independent control over the wet/dry blend.
Reverb
Reverb recreates the natural reflections of a physical space, whether a small room, a large hall, or an artificial plate reverb. A dry vocal may sound too isolated, while a touch of reverb adds depth and helps the vocal blend with other elements of the mix.
How to Do It
- Create a Reverb Aux: Insert your reverb plugin and set it to 100% wet.
- Choose Reverb Type: Plate, room, hall, chamber—each has a distinct character. Plate reverbs are famously smooth for vocals; a small room sounds more intimate; a large hall can sound epic.
- Set Pre-Delay: A short gap before the reverb begins can improve clarity. For vocals, anywhere from 10–50 ms is common.
- Adjust Decay Time: Around 1.5–2.5 seconds is a typical range for lead vocals, though it depends on tempo and style.
- Filter the Reverb: Rolling off lows and possibly some highs can prevent excessive mud and sibilant tails.
- Blend: Use the send level or the aux return fader to determine how much reverb you mix in. Solo the vocal to hear the effect, then check in the full mix.
A well-chosen reverb type and level subtly glues the vocal into the mix. Overdoing it can wash out important syllables, so a balanced approach is key.
Delay
Delay produces echoes of the vocal, which can fill empty spaces in the arrangement and create a sense of depth and groove. Whereas reverb is made of dense reflections, delay is characterized by distinct repeats that you can easily identify by ear.

How to Do It
- Create a Delay Aux: Insert your delay plugin set to 100% wet.
- Select Delay Time: You can set it manually (e.g., 300 ms) or sync to the project’s tempo (e.g., quarter note, eighth note).
- Feedback: Controls how many repeats occur. A low feedback results in one or two echoes, a higher feedback yields multiple repeats.
- Filtering: High-pass or low-pass filters can remove muddy lows or harsh highs from the repeats. This helps the delay sit behind the main vocal.
- Blend: Raise the send level so the delays are audible but not overwhelming. In many mixes, the delay is just enough to add subtle depth, rather than sounding like an obvious echo.
Many engineers automate delay so that it only becomes prominent at the end of certain lines or during specific moments in the song. This technique, often called a “delay throw,” can highlight key words or phrases without cluttering the entire performance.
Additional Vocal Chain Techniques
Beyond the core vocal chain, there are additional methods that can bring your vocal mix to a higher level of polish and creativity. These include parallel compression, vocal doubling, and automation strategies. Let’s explore each briefly.
Parallel Compression
Parallel compression is the process of blending a heavily compressed version of the vocal with the original uncompressed (or lightly compressed) version. It can give a vocal extra body, sustain, and perceived loudness without overly squashing its dynamic character
How to Do It
- Create a Parallel Aux: Send your main vocal to a separate aux track.
- Heavy Compression: Insert a compressor on the aux track and dial in an aggressive ratio (like 10:1), a low threshold, and a fast attack. Don’t be afraid to see 10+ dB of gain reduction.
- Blend: Bring the aux channel’s fader up slowly under the main vocal. The combined sound will be both dynamic (main track) and densely compressed (parallel track).
- Check Tonal Balance: Sometimes you might want to EQ or filter the parallel signal to avoid mud or harshness in the blend.
By using parallel compression, your vocal can maintain clarity and transients from the main track while benefiting from the fuller, more consistent presence of the heavily compressed version.
Vocal Doubling
Doubling involves layering two or more takes of the same vocal line or artificially creating duplicates to achieve a thickened sound. Real double-tracking (recording multiple takes) sounds the most natural, as each performance has slight variations in timing and phrasing.

How to Do It
- Performance Doubles: Record multiple takes of the same part. Align them so they’re tight but not identical. Tuck the doubles beneath the lead, maybe panning them slightly left/right.
- Artificial Doubles: Duplicate the original vocal track, nudge it by 10–30 ms, and possibly pitch-shift it slightly by a few cents. Some plugins (e.g., chorus effects or dedicated doubler plugins) can automate this process.
- Volume and EQ: Keep doubles lower in volume and possibly EQ them to avoid overshadowing the main vocal. De-ess them aggressively if sibilants stack up.
Vocal doubling can be used sparingly to emphasize chorus sections or more extensively for a wide, layered pop sound.
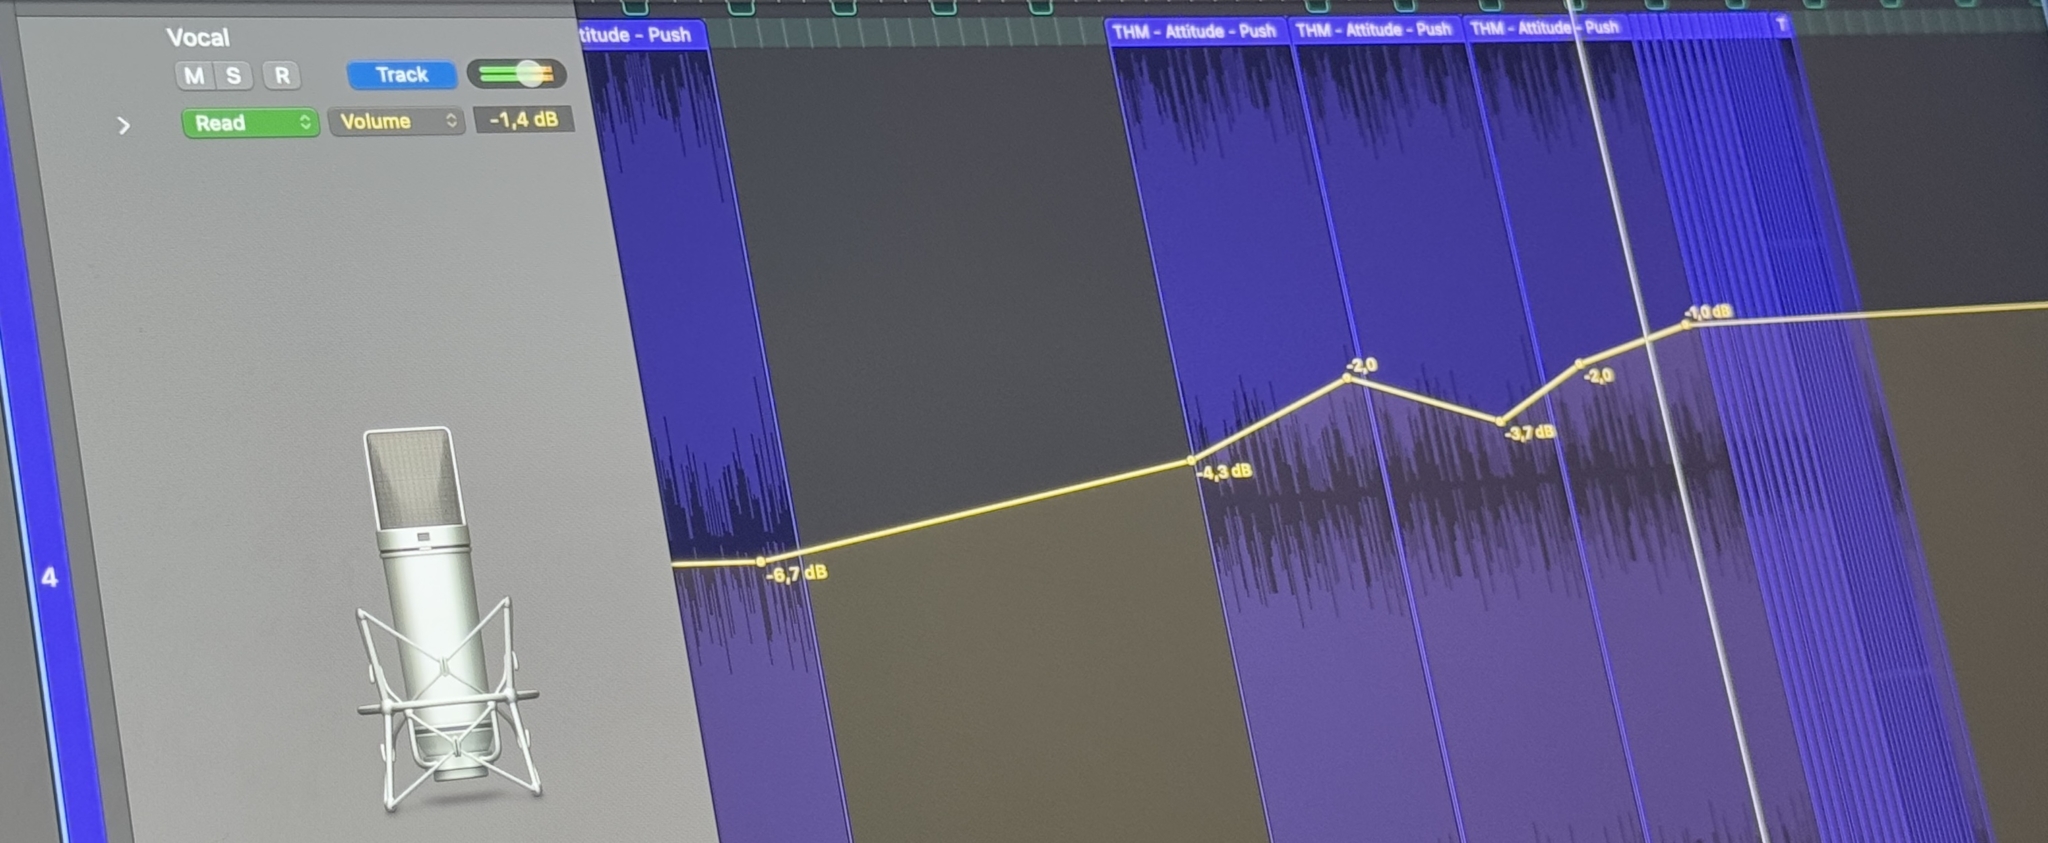
Automation
Automation is the secret weapon for fine-tuning your vocal mix. While compression can handle overall dynamics, it can’t make artistic decisions. By automating volume, panning techniques, or effect parameters, you can enhance clarity, expression, and impact.
How to Do It
- Volume Riding: Manually increase volume on quiet words or decrease volume on overly loud phrases. This helps maintain clarity throughout the track.
- Effect Throws: Automate reverb or delay sends on specific lines or words. For instance, you can add a long delay tail only to the final word of a phrase.
- EQ or Filter Automation: Some mixers automate a high-pass filter to reduce pop or breath noise on specific syllables, or they may automate a high-frequency boost for an especially airy moment.
- Multi-Stage Automation: You can automate levels before compression to feed consistent signal into the compressor, or automate after compression for final balancing.
Automation is where your mix truly becomes musical. It’s the difference between a static, one-size-fits-all vocal sound and one that adapts to each moment of the song.
Conclusion
Building a vocal chain from scratch might look complex at first glance, but following a structured, step-by-step approach simplifies the journey. As you grow more confident, you’ll adapt these techniques to suit different voices, genres, and creative goals. You may find yourself reversing the order of some effects, stacking compressors, or employing more advanced tools like dynamic EQ or multiband compression. Yet the fundamentals remain the same: identify what your vocal needs, choose the right tool for the job, and approach each step logically. By understanding how these processes work together, you’ll be well on your way to producing professional, captivating vocals in any style of music.
Remember, there is no single “correct” approach—only guidelines and best practices. The most important tool at your disposal is your ear. Keep listening, adjusting, and experimenting until your vocal processing chain feels just right, and always check your work in the context of the full mix, not just solo. With practice, you’ll develop your own intuitive sense for how much tuning to apply, where to cut with EQ, how aggressively to compress, which saturator flavors you prefer, how much high-end sparkle to add, how to control sibilance transparently, and which reverb types and delays best complement the song.
Embrace the process. Each step in this tutorial builds upon the last, ensuring that your finished vocal sounds polished, musical, and ready to stand out in a professional production. With these techniques, you’re equipped to transform even a modest recording into a standout vocal performance that can compete with commercial releases. Good luck, and happy mixing!
About the Author

Dídac
CEO & Founder of MasteringBOXDídac is a professional audio engineer, music producer and software engineer. He is the founder of MasteringBOX and the author of many of the articles on the blog.
Leave a comment
Log in to comment

