When you prepare a track for mastering, you want to present the best possible version of your mix without compromising dynamics, clarity, or balance. Mastering is often described as the final polish that makes your track commercially competitive and cohesive. If your pre-master (the file you deliver for mastering) is improperly prepared—perhaps it’s clipped, over-processed, or missing vital headroom—then no amount of mastering can fully correct it. This guide combines key points about how to properly export, organize, and finalize your mixes for mastering so you can achieve the best possible results.
Below you’ll find essential steps, technical tips, and workflow advice. Whether you plan to send your mix to a professional mastering engineer or master it yourself, careful preparation will help you get that final sparkle without compromising the integrity of your music.
Understanding the Mastering Process
Mastering takes your fully mixed track and applies subtle (or sometimes more pronounced) sonic enhancements and final level adjustments. The goal is to ensure your music sounds as good as possible across different playback systems, from tiny earbuds to large club PA systems. A well-prepared mix for mastering makes the process smoother and more effective, because it requires less corrective work and allows the engineer (or you) to focus on enhancing rather than fixing.

Why Proper Preparation Matters
The most common issues that hamper the mastering process include:
- Clipping or digital distortion embedded in the mix
- Overly limited or compressed material that leaves no dynamic range
- Improper bit depth or sample rate settings
- Missing or excessive master bus processing (such as limiters or certain effects)
- Poorly balanced frequency spectrum, either too boomy or too harsh
By paying attention to these details before you bounce your final mix, you can avoid unpleasant surprises later. The following sections break down the main considerations and best practices step by step.
Avoid Clipping
One of the most critical steps in preparing any track for mastering is to prevent digital clipping. Clipping occurs when your audio signal exceeds the 0 dBFS ceiling in a digital system, causing harsh, unpleasant distortion that cannot be completely fixed afterward.
What Is Clipping?
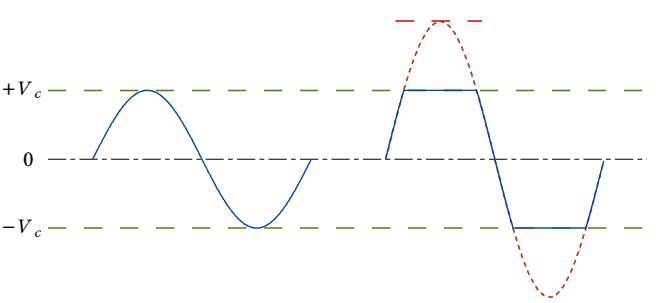
In digital audio, clipping happens when the waveform attempts to rise above the maximum level (0 dB in fixed-point systems) the system can accommodate. The waveform gets cut (or clipped) at that ceiling, resulting in:
- Distorted sound: Occurs when an audio signal exceeds its linear reproduction limits, generating undesired harmonic or intermodulation artifacts.
- Unpleasant artifacts: Unwanted noises (like clicks or graininess) introduced by errors, low bit depth, or improper processing.
- Reduced headroom: A smaller margin between average levels and clipping, limiting the maximum volume before distortion occurs.
32-bit floating-point systems can theoretically accommodate signals above 0 dBFS without immediately clipping, but once you render or convert to 24-bit or 16-bit (for distribution or streaming), those peaks can exceed the limit and cause audible distortion. Services like SoundCloud, YouTube, and other online platforms also often re-encode your audio, and any audio above 0 dBFS can translate into distortion after conversion.
How to Avoid Clipping
Preventing clipping in your mix is typically straightforward:
- Lower the master fader until peaks are comfortably below 0 dB, ideally around -6 dB.
- Make sure no individual track is clipping. Even if a track doesn’t show clipping inside a 32-bit float environment, it can still produce distortion when converting to a lower bit depth.
- Disable limiters that might artificially hold peaks at 0 dB, as they remove critical dynamic information that mastering needs. Simply lowering the overall mix is better than slapping a limiter on the master bus for volume.
It’s good practice to give the mastering stage between -3 dB to -6 dB of peak headroom. This ensures enough room to process the track without risking distortion.
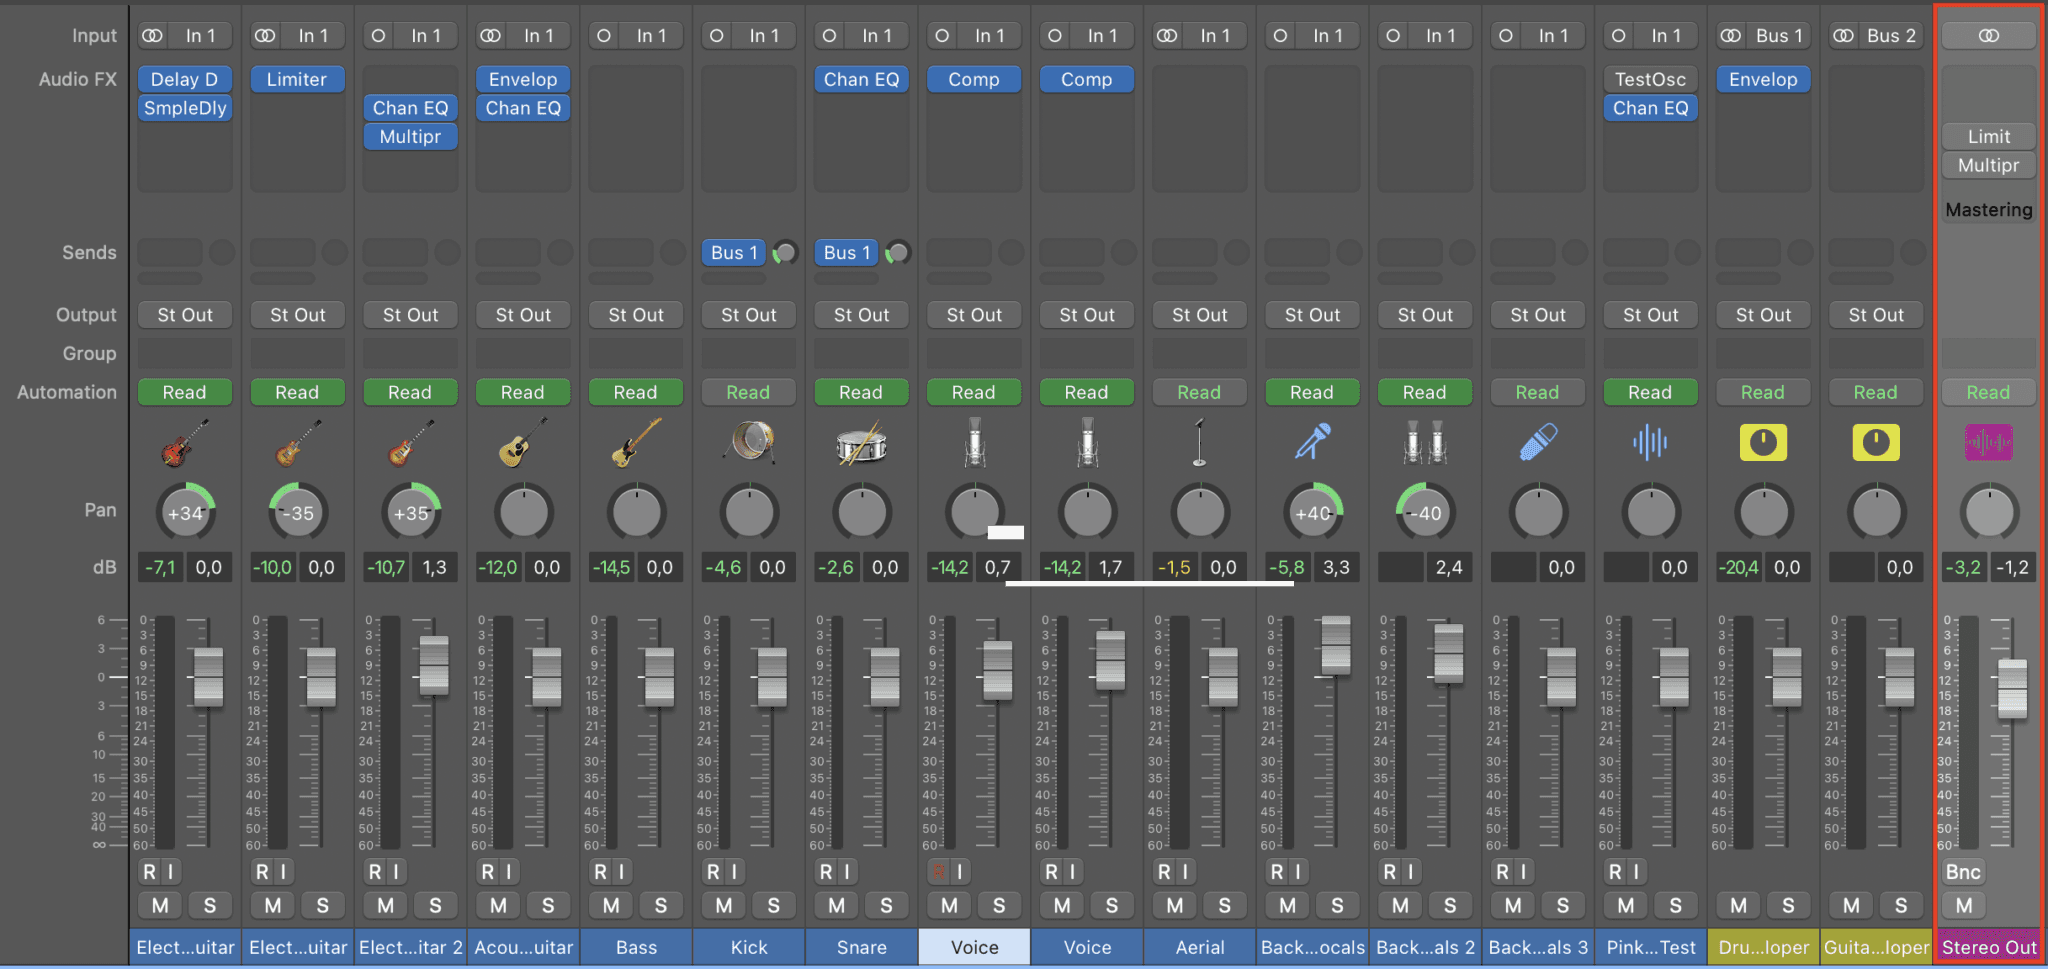
Avoid Master Bus Effects
When prepping your track for mastering, you should almost always remove any master bus effects that aim to boost the overall loudness or severely shape the dynamics of your mix.
Master Bus Effects vs. Creative Effects
If you’ve placed compression, limiting, EQ, or other dynamic tools on your master bus because it’s integral to your sound—say a gentle “glue” compressor or a vital EQ curve that your entire mix relies on—you can leave it on. However, any final-loudness or brickwall limiter plugins should be bypassed. The idea is to avoid overcooking the mix and leaving no room for the mastering engineer to make adjustments.
Some DAWs (like FL Studio or Ableton Live) might load a limiter on the master channel by default. Always check and disable it unless you specifically need that limiter effect for the character of the mix. If you remove a master bus limiter, be sure to check again for clipping and lower your master fader if necessary.
Project Settings
The bit depth and sample rate you choose can substantially affect the quality of your mix bounce. For example, using 32-bit floating-point can help avoid clipping issues, while matching your sample rate to your project prevents unnecessary conversions.
Bit Depth and Sample Rate
- Bit Depth: Exporting at 24-bit or 32-bit float is recommended for mastering. These bit depths offer more dynamic range than 16-bit, which preserves subtle details and reduces the risk of quantization noise.
- Sample Rate: Typically, if your project is at 44.1 kHz, you should render at 44.1 kHz. If you recorded and produced at 48 kHz, bounce at 48 kHz. Avoid unneeded sample rate conversions. Some producers work at higher rates (88.2 or 96 kHz); in those cases, stick to that same sample rate upon export to preserve audio fidelity.
Export with the right Settings
When exporting for mastering, select a lossless format (WAV or AIFF) at 24-bit or 32-bit with no dithering. Make sure you match your project’s sample rate (44.1 kHz or 48 kHz) to avoid unnecessary conversions. Avoid any normalization or additional limiting during export. Leave -3 dB to -6 dB of headroom to ensure clarity and flexibility.
Example in Logic Pro:
- Go to File > Bounce > Project or Section.
- Under PCM, choose WAV or AIFF.
- Set Resolution to 24-bit or 32-bit float.
- Match the Sample Rate to your project (e.g., 44.1 kHz).
- Disable Dithering if visible.
- Confirm Normalize is Off.
- Click OK or Bounce.

By following these steps, you’ll produce a file that preserves your mix’s dynamics and gives the mastering process the headroom it needs.
Review your Exported File
After the bounce, listen carefully from start to finish. Check for glitches, pops, missing elements, or abrupt fades. Confirm that no reverb tails or delays are cut off prematurely and ensure the overall level peaks near -3 dB to -6 dB. This final pass prevents unwanted surprises at the mastering stage.
Conclusion
Preparing your track for mastering involves both technical steps and a careful, artistic mindset. You want to retain all the best qualities of your mix—its clarity, depth, balance—while leaving enough room for that final polish.
By following these guidelines, you’re giving yourself—and the mastering engineer—every opportunity to produce a polished, professional final track. Mastering can then add the cohesive sheen, depth, and punch your music deserves, instead of fighting to repair fundamental mix issues.
In the end, great mastering starts with a well-balanced, unclipped, and carefully exported pre-master. With practice, you’ll refine these processes, streamline your workflow, and consistently deliver tracks ready to shine in any listening environment. Happy mixing and may your masters always sparkle!
Over de auteur

Dídac
CEO & oprichter van MasteringBOXDídac is een professionele audio-engineer, muziekproducer en software-engineer. Hij is de oprichter van MasteringBOX en auteur van veel artikelen op de blog.
Reacties
Thank you so much, I learned new things on this article,it will definitely be helping my tracks for good quality
Bonjour, je m’appelle Jean-Marc et je débute dans le mastering, quand je mixe le niveau du volume sur la table de mixage est 8 dB je suis en-dessous du niveau rouge, quand j’enregistre mon set avec Audacity j’enregistre en FLAC, fréquence d’échantillonnage 44100 Hz, débit VBR. Est-ce que j’ai encore besoin de faire des réglages avant de masteriser, merci pour vos réponses. Je vous donne le lien de mon set sur Soundcloud et svp dites-moi si le mastering est juste merci.Écouter DJ 2DL Live Set Trance N°208 par DJ 2DL sur #SoundCloud https://on.soundcloud.com/1aL2h
I appreciate this
Muchas gracias por su información. Me gustaría contar con un equipo para realizar el trabajo de masterización, pero no cuento con el. Sólo ejecuto canciones con guitarra acústica, armónica y mi voz. Me gustaría obtener el mejor resultado. Gracias
How do you make your MP3 to be 4MB ?
Thanks I really had problems but this really helped me a lot
You guys are life savers
Excelente!
Excelente!
can I turn on noise reduction and add pitch shifting or autotune effect?
Great job thanks alot .I really do appreciate
What about cutting out the clippings during sound editing, this is just a suggestion, well in all i think MASTERINGBOX is the way to go.
I just want to ask people who have used Mastering Box to do mastering, does it do a good job? Would you recommend it?
Gracias por los comentarios y la teoría. sugiero ejemplos prácticos con vídeo, por ejemplo, un vídeo como se mezcla después de haber sido grabada; así como la guitarra, el bajo, etc, cabe agregar, incluyendo en el vídeo lo dicho teóricamente, es tan solo una humilde opinión sugerida… por cuanto a los que recién empezamos nos ayudaría a entender mejor. No se preocupen de escribir tanto en quien sabe más, creo yo, es más importante ver el vídeo de lo escrito y dicho por parte de los que saben… enseñar. Muchas gracias por tan importantes aportes…. Creo, me parece que lo dicho por DEANKOBAYASHI es muy cierto…
Thank you for the article.
I was told that if levels are too hot going into the mix buss it is best to lower the levels of your tracks rather than lowering the master fader.
Is this a myth?
Thank you for your in-depth comment. There’re many reasons that can cause clipping when there’s absolutely no headroom (Peak normalized at 0dB) but the main reason that we ask for headroom is that the musician makes sure not to go over 0dB, 3 to 6dB of dynamic range will not be noticeable, but clipping will be.
I disagree in some of your statements, if your 32bit file goes over 0dB (which will usually happen) and you convert that file into 24bit you will get clipping cause the file will be cutted at 0dB, try if for yourself, practical examples are the best.
Additionally you should not apply any effects on the master bus, specially dynamics effect, again a 2:1 glue compressor is something that might be applied in mastering too.
Regards
The clipping discussion about bit depth is completely technically inaccurate. Internal floating point processing, 32 bits being one of the formats, allows you to represent smaller signals accurately, which become important with DSP techniques because when doing multiply accumulates, rounding errors at low bit depths can stack up and cause audible issues. Unintentional clipping is bad, but it is not caused by bit depth conversion.
Quantization is what you are discussing when reducing bit depth, from floating to fixed point and it has nothing to do with exceeding 0 dBFS. Switching bit depths used to be a big deal but the vast majority of programs now use automatic dithering to handle these issues and can convert different bit depths on the fly. The point is a 0 dBFS signal in 32 bit and 24 bit have exactly the same maximum peak level, converting between the two formats absolutely does not cause clipping. It causes truncation of the least significant bits which can add qunatization noise. Dithering is a way to mask the noise and make it less audible.
I have heard many people say to leave headroom in your file, but few can come up with a plausible technical explanation as to why, they are just repeating myths they have heard. What you are actually doing by leaving 3 dB to 6 dB of headroom is reducing your dynamic range by 3 to 6 dB. In practice this reduction is rarely the limiting factor for your tracks SNR, but changing between levels, i.e. gain is literally the easiest DSP processing you can do to audio as each sample is multiplied by a fixed integer. If I send in a file that peaks at 0 dBFS, there is no change to the signal by applying -3 or -6 dB of gain to the file to add headroom if needed, say for something like a compressor where you are applying make up gain that could exceed 0 dBFS, though arguably the compressors output should be set up so that make up gain does not cause clipping. Clearly you should not be letting any track clip, or any processing stage clip, and you should have your gain structure set up so no track is boosted above 0 dB because gain above zero dB is going to amplify noise, while attenuating will attenuate noise.
I have also heard claims that you need to leave headroom for the conversion to lossy formats like mp3, and this is also a myth. The way lossy compression like mp3 work is by reducing the number of bits in frequency bands to allow for a smaller number of bits to represent that portion of the signal dynamically based on psychoacoustic masking. This processing by design will not increase the peak of the input signal, which is the only way clipping could occur with encoding.
What can happen with lossy conversion is poorly chosen settings, like rolling off the high end at 15 kHz and assuming lots of correlation which can obliterate the stereo field. Unfortunately sites like Soundcloud and You tube are not transparent about their processing and you are pretty much stuck with whatever they are doing. If I was having problems, I would try sending in a -3 or -6 dB file and see if it helped, but if it does, it is working around poorly chosen encoding settings.
I tend to agree with you about master bus effects, that is what mastering is suppose to be, though there is a school that believes applying a 2:1 ratio “glue” compressor on the master bus is the way to go.
Thanks for suggestions
Nice work! Thanx for it tool!
eso me ahorra algunos interrogantes
Good suggestions
Laat een reactie achter
Log in om een reactie te plaatsen