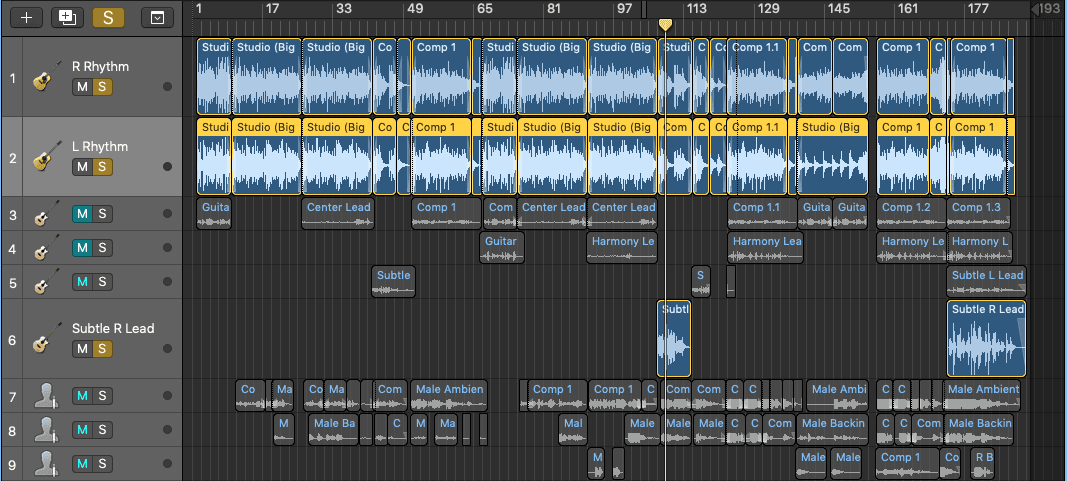
Bringing a song to life in the studio requires careful consideration of several moving parts and how they interact. The more instruments, layers, and effects you add, the more complex the production becomes. It doesn’t take long to rack up stems in the double or triple digits. You might wonder how producers end up with a finished product that coheres and clarifies every mix element. Beyond the more technical aspects of mixing with EQ, compression, panning, etc. are two simple buttons every engineer should know about: mute and solo.
Why Mute and Solo are Important
We’ve used this analogy before, but let’s think of a song or mix as a dish. The best recipes are full of various ingredients that, on their own, might range from bland to overbearing. But when combined, stirred, and baked, they add something important to the whole. Of course, when cooking, it’s easy to get measurements wrong. And more often than not, it’s too late to go back and fix mistakes in the recipe. Imagine being able to take your completed dish and magically adjust your earlier steps to improve the result. Fortunately, with music production, you can go back and examine each individual part whenever you like by using the mute and solo buttons.

If you’ve read some of our previous posts, such as «what is mixing?«, you know that context is key when mixing. In that case, muting and soloing tracks seems sacrilegious. The mix must sound great as a whole, so why worry about an individual track devoid of contact? While proper mixing must take place with all elements in mind, some tweaks are better made alone. For instance, you’ll want to solo a track to check how it’s affected by slight changes in EQ or compression. Or, consider pitch correction on a vocal track. You’ll eventually want to hear how minor vocal adjustments sound against the rest of the song. But when making these small changes, sometimes soloing the vocal track is necessary or helpful to fine-tune.
This also goes for other mix adjustments, from adding compression to drum hits to syncing up guitar notes. Muting and soloing gives you the auditory space to hone in on a specific task before jumping back into the big picture.
Using Mute and Solo Sparingly
Just because mute and solo serve important roles doesn’t mean they should be overused. There are proper times and places for these features, and knowing when and what they are will enhance your mix greatly.
Performances and Creative Choices
The mute and solo buttons can be used to foster creativity during recording and mixing. For instance, most vocalists will record alongside the entire mix so they can perform in full context. However, muting secondary arrangements can help the singer focus and tune better. Or, soloing a single track (say, drums or bass) can yield unique results when recording vocals or other instruments. Some producers might want to record alternative vocal takes with less going on in the monitors just to note any differences in performance. These differences can function as layers or replacements if they turn out better than the originals. Muting and soloing sections allow the performer and producer to hear new melodies, polyrhythms, and possibilities that might otherwise be covered up.
Inspecting Interactions
While mute and solo can and should be used during recording, they’re even more useful during mixing. Here is where context comes back into play. However, this time we don’t mean the entire mix, but rather smaller chunks of the mix. Perhaps the most powerful use of mute and solo is the ability to inspect the interactions of mix elements more closely and unencumbered by the rest of the song. When you have 50+ tracks to deal with, you’ll have a hard time hearing how the drums and bass line get along unless you cut away the rest of the noise and just solo those two elements. These two buttons help you make pinpoint decisions, whether it’s figuring out how to make the lead guitar stand out against the rhythms or adjust EQ among the high-frequency tracks (cymbals, vocals, etc.).

Solo Doesn’t Necessarily Mean Single
If it wasn’t just made clear, the solo button doesn’t just let you hone in on one track but a selection or group of tracks. Conversely, muting will temporarily cut the sound from whichever track or group of tracks you don’t want to hear when mixing. Understanding this can really help when you have busses and groups in your mix. Rather than muting every drum element, for instance, you can mute the drum bus. Of course, if you only wanted to hear the snare against the rest of the song, you could simply solo the snare on the drum bus.
Conclusion
Sometimes the more unassuming features are in fact the most powerful tools. This certainly holds true for the mute and solo buttons. The more time you spend recording and mixing, the more you’ll find yourself using these buttons for a variety of purposes. If used properly, muting and soloing offer the best ways to isolate mix elements, uncover new creative avenues, and make important adjustments for groups of tracks.
And one last thing: remember that the solo button overrides the mute button. So if you want to keep a track quiet, make sure only the «M» is pressed and not the «S» as well!
Sobre el autor

Ethan Keeley
Escritor, locutor, músico y editor de audioEthan Keeley es músico, locutor y escritor de Rochester, Nueva York. Cuando no está de gira con su grupo Unwill, trabaja en nuevas canciones e historias.
Deja un comentario
Inicia sesión para comentar


