To get the most out of the mastering process, you have to prepare your mixes properly. This guide will explain how to prepare your track for mastering, the main issues, and how to avoid them.
Many producers and artists don’t know how to prepare their tracks for mastering. Most of the steps are incredibly easy to implement and will make your masters sound a lot better in no time.
Prepare your track for Mastering: Ask yourself these three questions
– Does your track have clipping?
– Do you have any effects on the Master Bus?
– What are your project settings?
If you can answer them, then you’re halfway there. If not, don’t worry! Even if you don’t understand what clipping is or where to locate the master bus, we will explain every detail so you can correctly prepare your track for mastering.
Does your track have clipping?
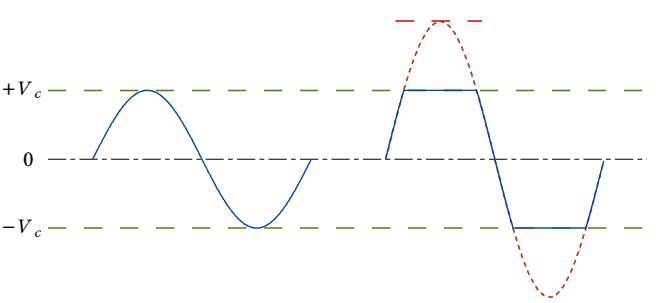
To correctly prepare your track for mastering, your track mustn’t have clipping issues. But, what is clipping? Clipping is a waveform distortion that occurs when the signal (or an amplifier) is overdriven and attempts to go over the limit. When this happens, the signal is cut, causing an unpleasant sound. In digital audio, the limit is 0dB when working on 16bit or 24bit files. 32-bit floating-point files don’t have this issue as the limit point is not defined and may go over 0dB. Below you can see an explanatory image:

It is very common for inexperienced engineers to raise the main fader while producing to hear the mix louder. First of all, mixing with loud volumes is not recommended because listeners probably won’t listen to your mix as loudly, and proportions on the mix change a bit depending on the volume. The mix won’t be better if you hear it louder, although it might feel that way.
As most sequencers work on a 32-bit floating-point, you might not hear the clipping in the mix, but when you render it to 24 or 16bit, the file is cut to the signal limit of 0dB, causing significant distortion. The same will happen if you render to mp3 or render in 32bit-file and upload it directly to any online media like SoundCloud ,YouTube , or another music streaming service.
Many people worry too much about loudness and raise the volume in the mix. Don’t worry about that. Mix your song with normal levels, and when finished, you can master your tracks through MasteringBOX.
How can I solve this?
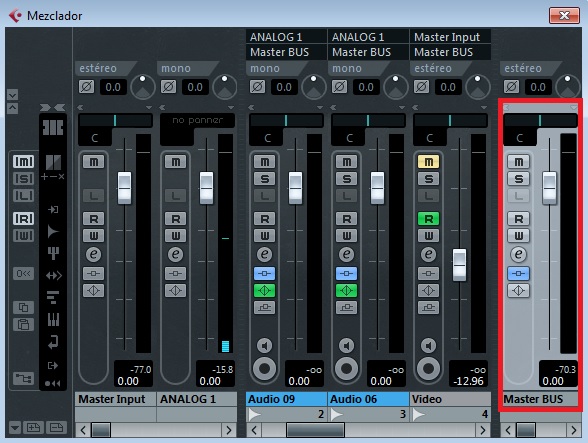
The solution for clipping is as straightforward as just lowering the master fader. As long as you don’t have clipping, it will sound ok, although the best solution would be to leave between -3dB and -6dB of headroom. You can find your Master fader in the digital mixer, usually on the right-hand side. To access the mixer in Cubase press F3, in Protools «Ctrl+=» or «Ctr+?», in Ableton Live «Ctrl + Alt + M», in FL Studio press F9 and in Logic «Cmd +2». If you are using MAC, just user Cmd instead of Ctrl in the shortcuts mentioned above.
You can also produce clipping on individual tracks if you don’t work on a 32-bit floating-point, so make sure to check that too!
MasteringBOX will warn you if your file has clipping, but now you know how to solve it!
Do you have any effects on the Master Bus?
When you prepare your track for mastering, you shouldn’t affect the Master bus unless it is essential for the sound you want to achieve. So open your mixer and go to the Master Section, disable any effect in the Master, particularly dynamic effects like compression and limiting.
Some DAW’s like FL Studio and Ableton Live has an audio limiter in the master channel by default, so please check the master bus. Even if you don’t remember adding any effect, it may still be present.

When you disable a compressor or limiter on the master bus, please make sure to lower the master fader too, or you’ll probably end up with clipping.
What are your project settings?
The last step to prepare your track for mastering is to check the Bit depth and the Sample Rate in your project. It’s a good idea to use higher Bit depth on render, but it’s vital that you don’t use a different Sample Rate. A typical Sample Rate would be 44.1Khz, but it might also be 48Khz, 88.2Khz, or 96Khz. If you don’t know your Bit depth and Sample Rate, you’ll be «safe» rendering on 32-bit/44.1Khz in most cases.
How to prepare your track for MasteringBOX
There are many more things to consider for a perfect mix, but for now, these are the three main steps to prepare your track for mastering correctly. Open your project, render your track now and upload it to MasteringBOX to test if everything’s correct. If you follow the instructions correctly everything should be fine. If a red or blue notification shows, check the message to understand what’s wrong.
Good luck!
Post image under Creative Commons License by Samuel L. Livingston
Sobre el autor

Dídac
CEO y Fundador de MasteringBOXDídac es un ingeniero de audio profesional, productor musical e ingeniero de software. También es el fundador de MasteringBOX y el autor de muchos de los artículos del blog.
Deja un comentario
Inicia sesión para comentar


