Many beginners in audio mixing find themselves confused by send and insert effects. Both approaches involve adding plugins to a sound source, so it’s not immediately obvious why there are two methods—or when to choose one over the other. Yet their differences are crucial to shaping a cohesive, efficient, and professional-sounding mix.
In this article, we’ll explore insert vs send effects in an in-depth yet approachable way. We’ll walk through examples in Logic Pro and dive into practical reasons for using one method over the other, such as CPU management, blending dry/wet signals, and sharing a single effect across multiple tracks. By the end, you’ll understand the fundamental principles behind inserts and sends, learn how to set them up, and know how to apply them in various mixing scenarios.
Table of Contents
- Insert Effects
- Send (Aux) Effects
- Comparison and Practical Examples
- Workflow Tips for Beginners
- Final Thoughts
- Conclusion
Insert Effects
Insert effects—sometimes called “inline” effects—are loaded directly on a track’s channel strip. Imagine your audio signal flowing straight through these plugins one by one. Everything that enters this chain is modified according to the insert effects’ parameters. This approach is simple and direct: the effect you choose affects only that particular track.
Below, we’ll break down what insert effects are best for, how to insert them in Logic Pro, and which types of effects typically work well as inserts.

What Is an Insert Effect?
Insert effects process the entire audio signal on a single channel. If you put an EQ on an electric guitar track, all of that guitar’s sound passes through the EQ. If you insert a compressor, it controls the dynamics for the entire track. Because insert effects fully transform the original audio, they’re typically used for tone-shaping or level-controlling processes that are unique to each source. Some common insert effects:
- EQ – Shapes the frequency content (e.g., removing unwanted lows, boosting presence).
- Compressor – Controls dynamics, adding punch or smoothness to a track.
- Noise Gate/Expander – Cuts out low-level noise below a threshold.
- Pitch Correction – Fixes or alters pitch (e.g., using Auto-Tune or Logic’s built-in Pitch Correction).
- Distortion/Saturation – Adds warmth, grit, or harmonic excitement.
- Aural Exciter – Adds harmonic distortion for extra air.
- Modulation (sometimes) – Chorus, flanger, or phaser when they’re an integral part of the track’s core sound.
The hallmark of insert effects is that you typically want them to act on that track alone, adjusting its tone, dynamics, or character in a unique way. For example, you might have a compressor set up specifically for a vocal, tailored to how that singer phrases words or how the microphone captures them. With an insert, you’re focusing on individual track needs rather than a shared environment.
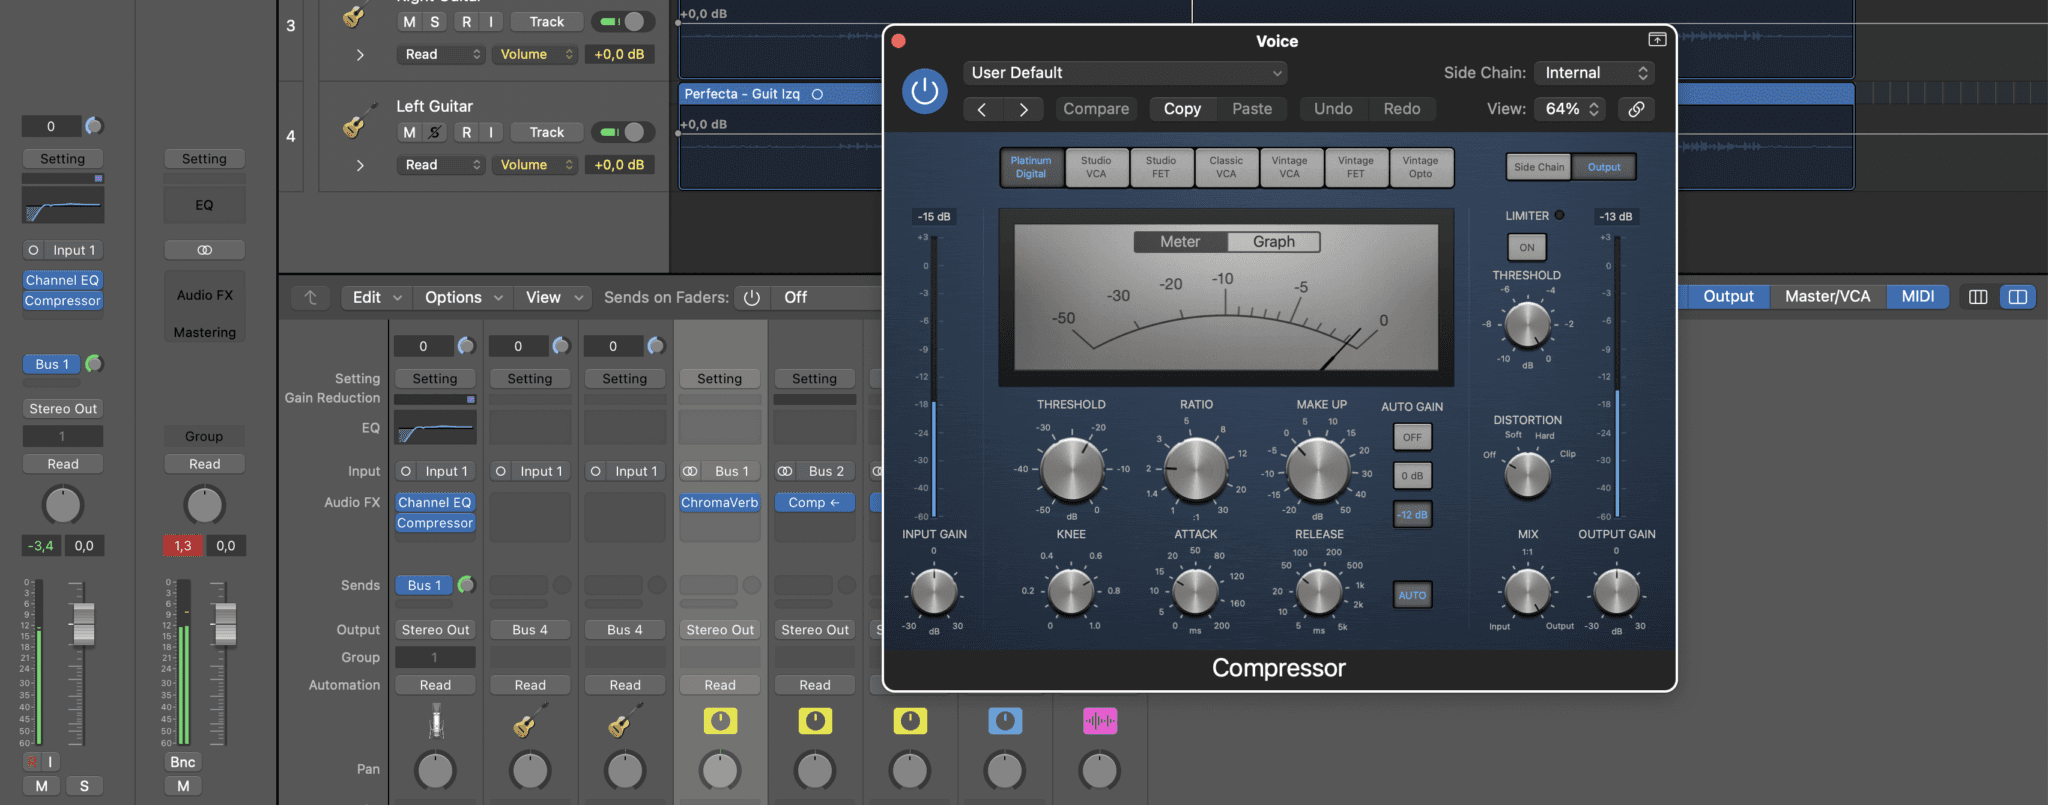
How to Insert an Effect on a Track in Logic Pro
- Select the Track: In Logic Pro, choose the desired track in the Inspector or Mixer.
- Find Audio FX Slots: On the channel strip, look for the Audio FX section. Click an empty slot to reveal the plugin menu.
- Choose a Plugin: From the categories (e.g., EQ, Dynamics, Reverb, etc.), select the plugin you want to insert. For example, Channel EQ or Compressor.
- Adjust Order: The order of insert effects matters. An EQ placed before a compressor behaves differently than one placed after. Drag plugins up or down in the chain to experiment.
- Fine-Tune Settings: Each plugin has its own controls. Tweak your compressor threshold, EQ frequency bands, or gate release time until it sounds right for the track.
- Bypass or Remove if Needed: Toggle the power button next to the insert slot to hear the track with or without the effect. Remove a plugin by choosing “No Plugin.”
Common Insert Effects and Plugin Recommendations
Logic Pro ships with a variety of stock insert effects:
- Channel EQ – A versatile, parametric EQ suitable for cutting or boosting frequencies.
- Compressor – Models various classic compressor types; great for vocals, drums, and more.
- Noise Gate – Useful for eliminating hum or room noise when signal is low.
- Pitch Correction – An easy way to correct off-pitch vocals in real time.
- Phat FX – Adds saturation, filtering, and modulation for extra character.
You can also find free third-party insert plugins. Various developers offer free EQs, compressors, or saturation tools that can expand your arsenal without costing money. When you’re ready for premium tools, consider brands like FabFilter, Waves, iZotope, or Valhalla DSP for specialized EQs, compressors, and other effects.

Send (Aux) Effects
While insert effects transform a track’s entire signal, send effects operate in parallel. You copy (or “send”) some of the track’s audio to an aux channel, then place an effect on that aux. The original track remains mostly dry, while the aux carries a processed version of the sound. By blending them, you mix the wet and dry signals together. This is different from an insert, where you replace the dry signal with the processed signal.
Below, we’ll discuss why you’d want a parallel approach, how to set up sends in Logic Pro, and which effect types are most commonly employed on aux channels.
What Is a Send (Aux) Effect?
Send effects—also known as “bus” or “aux” effects—are perfect for time-based processing such as reverb and delay, parallel compression, or other treatments you might want to apply to multiple tracks simultaneously. The signal is split so the track output remains “unaffected,” while an additional line of audio feeds the effect.
Key characteristics of a send effect:
- Often set to 100% wet on the aux channel.
- Multiple tracks can share the same effect for a cohesive sound.
- The send level knob on each track controls how much of that track is fed into the effect.
- Separate volume control: You can fade down the aux return to instantly adjust how much wet signal is in your overall mix.
This approach not only saves CPU (using a single plugin for multiple tracks) but also creates a sense that these instruments are in the same acoustic space or environment. For instance, sending all vocals to one reverb or all drums to a single room reverb helps them sound like they were recorded together in a consistent space.

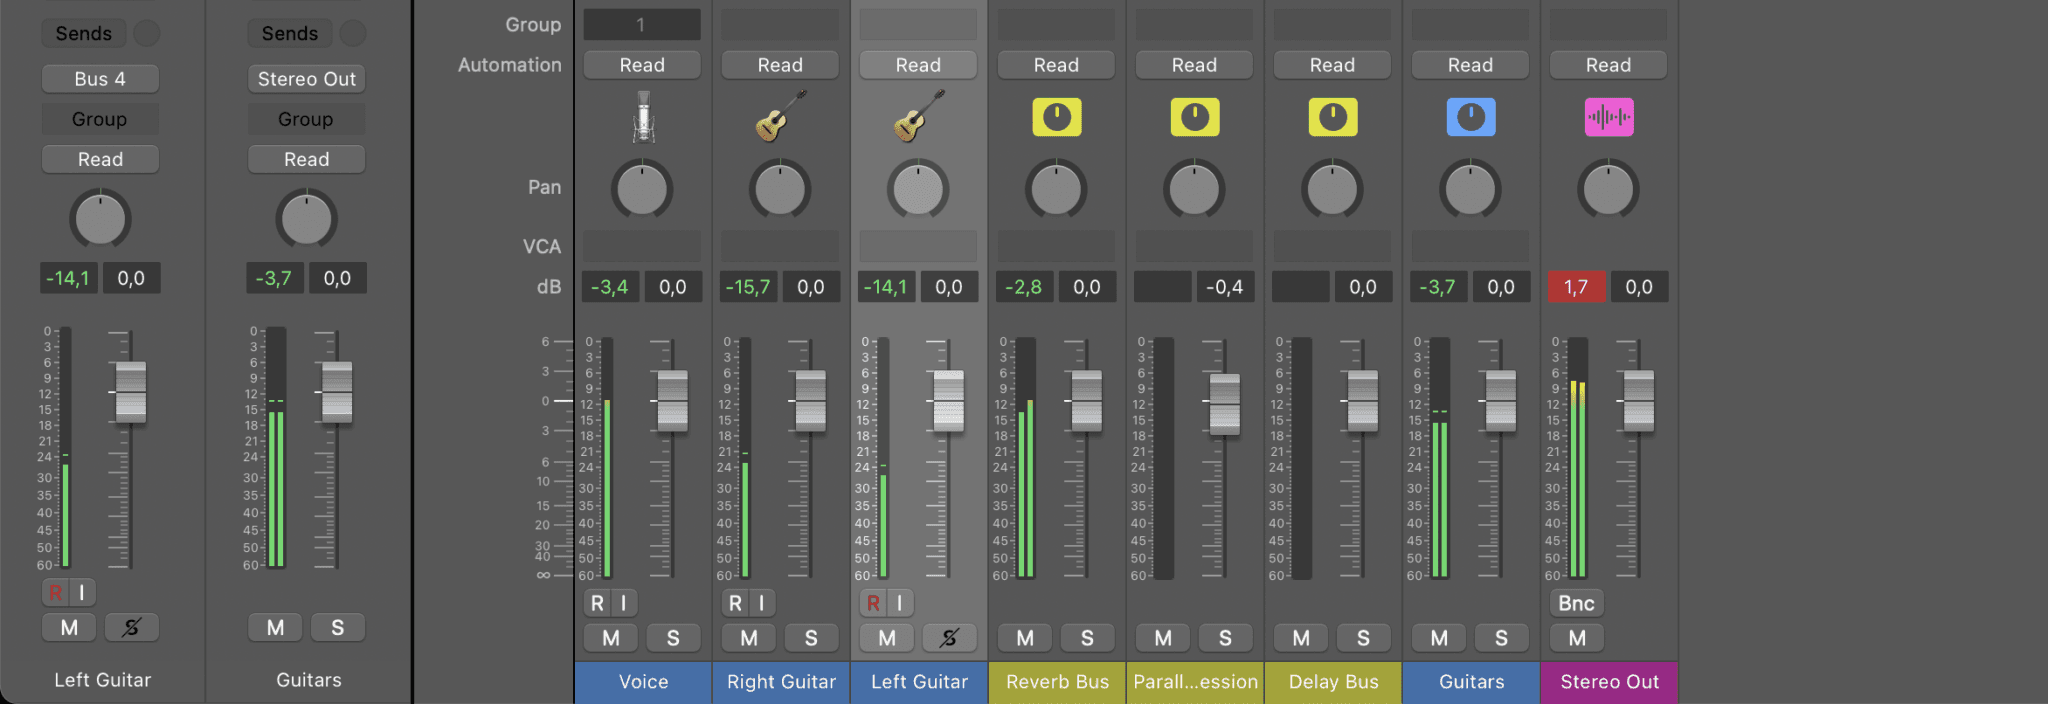
Setting Up an Aux Send in Logic Pro
- Create a Send on the Track: In the track’s channel strip, find the Sends area. Click an empty send slot and select a Bus (e.g., Bus 1).
- Aux Channel Appears: Logic automatically generates an aux channel strip with the bus as its input. Rename the channel (e.g., “Vocal Reverb”) to stay organized.
- Insert an Effect on the Aux: On the newly created aux channel, insert the desired effect—perhaps a reverb. Set the plugin’s mix or dry/wet control to 100% wet to avoid duplicating the original sound.
- Adjust Send Level: On the original track, you’ll see a round knob for the send you just created. Turn it up to feed more of the signal into the aux.
- Blend with Aux Fader: The aux channel has its own fader. You can raise or lower it to control the overall presence of that effect in your mix.
- Multiple Tracks to Same Aux: Repeat the above steps on any other track you want to send to the same effect. This centralizes your processing and can create a uniform space.
Plugin Recommendations for Send Effects
- Reverb: Logic’s ChromaVerb or Space Designer are excellent. For external options, free plugins like Valhalla Supermassive can produce lush, spacious reverb tails. Paid favorites include Valhalla VintageVerb, Lexicon PCM bundles, or FabFilter Pro-R.
- Delay: Logic provides Tape Delay and Stereo Delay, both of which are outstanding. Free alternatives include Valhalla Freq Echo or Chow Matrix. If you go premium, Soundtoys EchoBoy or Valhalla Delay are legendary.
- Parallel Compression: Use a Logic Compressor on the aux and crush it hard. Then blend it with the dry track for extra punch without losing clarity.
- Creative FX Chains: On aux channels, you can chain multiple effects for imaginative sound design—delay into reverb, then saturation, etc. Routing multiple instruments to a single multi-effect aux can yield a cohesive and distinct vibe.
Comparison and Practical Examples
Now that we’ve explored how insert effects and send effects work in Logic Pro, let’s compare them side-by-side. We’ll also walk through real-world examples where each approach excels. Understanding these distinctions ensures you choose the right tool for the job in any mixing scenario.
Insert vs Send Effects at a Glance
When deciding whether to use an insert or a send effect, it helps to consider how the effect interacts with the audio signal. Insert effects completely process a track’s sound, making them ideal for shaping individual elements. Send effects, on the other hand, allow multiple tracks to share the same processing, offering flexibility and efficiency. Below, we break down the differences in a quick-reference comparison table.
| Aspect | Insert Effect | Send (Aux) Effect |
|---|---|---|
| Signal Flow | Directly on a track; processes the entire signal in series. | Parallel path; splits the signal to an aux channel, blending wet and dry separately. |
| Dry/Wet | Often 100% wet on that track (unless the plugin provides a mix knob). | Original signal stays dry on its channel; aux carries the wet signal for blending. |
| Scope | Affects only that track’s audio. | Multiple tracks can share the same effect instance, saving CPU. |
| Use Cases | EQ, compression, gating, saturation, pitch correction—unique track-level shaping. | Reverbs, delays, parallel compression—creating a shared space or parallel processing. |
| CPU | Each instance uses processing power. | One plugin can serve multiple tracks, reducing CPU load. |
| Level Control | Level is adjusted via the plugin output or the track fader. | Level is adjusted via the send knob on each track and the aux channel fader. |
Example Scenarios
The best way to understand the difference between insert and send effects is to see how they’re applied in real-world mixing situations. Below are practical examples where each approach is used to achieve a specific result. By studying these cases, you’ll gain a clearer sense of when to reach for an insert and when a send is the better choice.
Vocals with EQ and Compression
For a lead vocal, you typically add an EQ and a compressor as insert effects as part of the vocal chain. You want full control over that vocal’s frequency balance and dynamics, so you shape the tone in a dedicated, track-specific way. The insert approach ensures the entire vocal signal goes through those processors.
Adding Reverb to Vocals
Reverb is often used on a send. By routing the vocal track’s signal to an aux loaded with a reverb plugin, you can blend the wet reverb tail under the dry vocal. This method prevents the vocal from becoming muddy, retains clarity, and allows multiple vocal tracks to share the same reverb. You simply adjust how much reverb each vocal sends to the aux.
Drums and Room Reverb
If you want a consistent “room” sound on a full drum kit, a send-based approach can unify the kit. Each piece of the kit (kick, snare, toms, overheads) can feed the same reverb aux, giving an impression that the drums were recorded in a single space. This approach also saves CPU since one reverb plugin serves the entire kit.
Parallel Compression on Drums
Sometimes called “New York compression,” parallel compression is a classic scenario for a send effect. You feed drums into an aux channel where you insert a heavily compressed or even distorted compressor. Blend this crushed signal with the unprocessed drums to add body and density without losing the original punch.
Guitar Amp Simulation vs. Guitar Delay
A guitar amp sim often belongs on an insert because you’re fundamentally transforming the guitar’s tone. By contrast, a rhythmic delay might work as an insert or as a send, depending on your preference. If only one guitar uses that delay, you could insert it and set the wet/dry mix as needed. But a send offers flexibility if you plan to share the delay with other instruments or want a separate fader for controlling the delay level independently.

Bass with Parallel Distortion
Sometimes you want a distorted bass that still retains a clean, punchy low end. By creating an aux send to a distortion plugin, you can mix the distorted signal in parallel with the clean one. This means you don’t lose the fundamental low frequencies, because the unprocessed (or lightly processed) bass remains intact on its original channel.
Workflow Tips for Beginners
Finally, let’s look at some practical workflow ideas to help you balance insert and send effects in your mixes. These tips can streamline your creative process and keep your sessions organized.
Name Aux Channels Clearly
When you create an aux for reverb or delay, rename it right away (e.g., “Vox Hall Reverb,” “Drum Plate,” or “Delay Quarter-Note”). This helps you keep track of what each bus is doing. If you leave them as the default “Bus 1,” “Bus 2,” etc., confusion arises once your session grows.
Use Post-Fader Sends by Default
Logic Pro defaults to post-fader sends. This usually works best for time-based effects like reverb or delay because if you lower the track’s main fader, you also reduce the amount feeding the effect. That keeps the wet/dry balance more consistent. You can switch to pre-fader sends for specific parallel processing techniques like parallel compression, but stick to post-fader for most reverb or delay sends.
Organize a Few Go-To Sends
In your template or an empty project, set up:
- Short Room Reverb on an aux channel for a subtle sense of space.
- Large Hall Reverb for bigger, more spacious effects.
- Tempo-Synced Delay for vocals or lead instruments.
- Parallel Compression bus for drums or vocals.
This approach saves you from constantly recreating these auxiliaries. As you add tracks, you can simply route them to the existing sends, adjusting send levels to taste.
Don’t Overdo It
While it’s tempting to load your project with multiple reverb or delay sends, too many different ambiences can sound cluttered. Using one or two carefully chosen reverbs often yields a more cohesive mix. Keep an eye on CPU usage, too. If you notice your system bogging down, consider consolidating effects into fewer aux channels.
Check for Phase Issues
When you blend the original signal with a heavily processed parallel track, phase issues can sometimes arise. Use your ears to detect if something sounds hollow or if certain frequencies disappear when the wet signal is mixed in. Many modern plugins have built-in phase alignment; nonetheless, be aware that extreme processes can introduce some phase coloration.
Apply Insert Effects Before Sends
Generally, apply corrective insert effects like EQ or compression on the track first, then send some of that processed sound to a reverb or delay. If you send an uncompressed vocal to a reverb, the reverb might respond differently to transient spikes. By compressing the vocal first, the reverb receives a more controlled signal, often leading to a more balanced and natural effect.
Final Thoughts
Send and insert effects each serve a distinct and valuable role in shaping a mix. Inserts take full control of a single track, transforming its tone and dynamics in series. Sends allow you to split the signal and blend a processed version in parallel—a powerful technique for reverb, delay, and parallel compression.
Below, we’ll recap the main takeaways on how to balance these two approaches in your mixing workflow.
Key Takeaways
- Insert Effects:
- Best for individual sound shaping like EQ, compression, gating, or saturation.
- Directly placed on a track’s channel strip, so the entire signal is processed.
- Ideal when you don’t need to share the effect across multiple tracks.
- Send Effects:
- Best for time-based or parallel processes like reverb, delay, and compression.
- Lives on a separate aux channel, letting you blend wet and dry signals.
- Allows multiple tracks to use one plugin, saving CPU and creating a cohesive atmosphere.
- CPU Management: Inserts can add up quickly if you place the same heavy plugin on many tracks. Sends help you reuse a single effect for multiple instruments, preserving processing power.
- Consistency and Cohesion: Sending multiple instruments to the same delay or reverb bus creates a uniform ambient space. This approach can make your mix sound more realistic or glued together.
- Parallel Magic: Parallel compression, parallel distortion, or parallel modulation are mixing tricks that often rely on the send/aux workflow. You preserve the original track’s dynamics or tone while adding a processed flavor in parallel.
- Practical Setup: In Logic Pro, create a bus for your send effect, insert a 100% wet plugin on the aux, and use the send knobs on each track to feed signal into it. For inserts, simply choose the plugin on the track’s Audio FX slot.
- Experimentation: There are no hard rules. Sometimes you might want a reverb insert if you want a track fully washed in reverb. Or you might do parallel EQ via a send if you’re after a creative effect. But the guidelines here will cover 90% of typical scenarios.

Conclusion
Whether you’re shaping the frequency balance of a single track with an EQ insert or blending multiple instruments into the same reverb, understanding the difference between insert and send effects is essential. Start by inserting essential corrective tools—EQ, compressor, gate—on each track. Then use sends to add reverb, delay, or parallel processing that ties everything together.
If you’re just learning the ropes, focus on a small set of carefully chosen effects. You’ll be amazed at how much you can accomplish with even one or two reverbs and a couple of delays. Over time, build up your template, create your favorite go-to send channels, and refine your signal flow. With consistent practice, you’ll master the art of balancing inserts and sends—resulting in mixes that are more cohesive, CPU-efficient, and polished. Happy mixing!
Sobre el autor

Dídac
CEO y Fundador de MasteringBOXDídac es un ingeniero de audio profesional, productor musical e ingeniero de software. También es el fundador de MasteringBOX y el autor de muchos de los artículos del blog.
Deja un comentario
Inicia sesión para comentar